태그 속성 조정하기
이번에는 태그의 속성을 변경하거나 지정하는 방법을 알아보겠습니다.
태그의 속성이라함은 예를 들어
<p style="color:red" onClick="alert(1);" class="hello"></p>
위의 코드에서 style, onClick, class를 의미합니다.
태그의 속성은 저것외에도 자신이 지정하고 싶은 속성을 넣을 수 있습니다.
데이터 번호를 지정한다고 하면 dataNo 와 같은 속성을 지정할 수 있고 값도 지정할 수 있습니다.
<p dataNo="1">1 data</p>
그럼 속성을 지정하는 방법에 대해 알아보겠습니다.
속성과 속성값 지정하기
먼저 태그에 속성을 추가하는 방법에 대해 알아보겠습니다.
setAttribute를 사용합니다. ^^
선택자.setAttribute(속성명, 속성값)
그럼 태그에 class속성을 추가하고 값으로 hello를 지정한다면?
다음과 같습니다.
선택자.setAttribute('class', 'hello')
자, 그럼 예제를 통해 알아봅시다.
<!DOCTYPE html>
<html>
<head>
<meta charset="utf-8" />
<title>COREASUR - JavaScript - attribute</title>
<script>
window.onload = function(){
    var target = document.getElementsByTagName('p')[0];
    target.setAttribute('class','hello');
};
</script>
</head>
<body>
    <p>here</p>
</body>
</html>
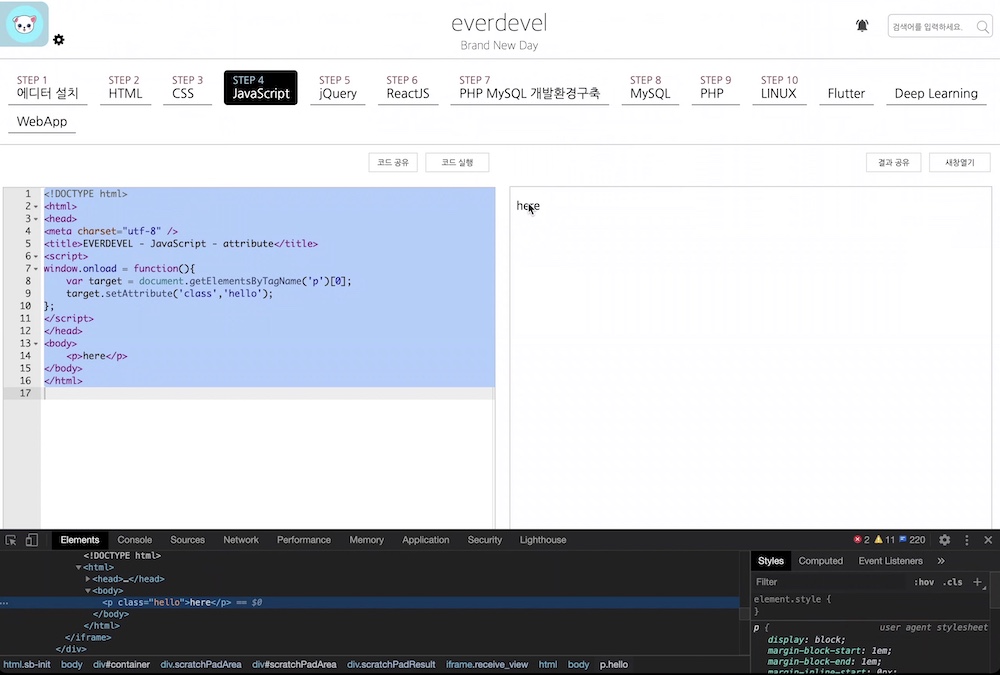
그럼 위의 코드를 실행하여 결과를 봅시다. ^^
개발자도구를 열고 해당 태그를 선택해보면 class="hello"가 보입니다.
즉, 잘 추가가 되었습니다.
속성값 가져오기
이번에는 속성의 값을 가져오는 방법에 대해 알아보겠습니다.
속성의 값을 가져올 때는 getAttribute를 사용합니다.
선택자.getAttribute(속성명)
자, 그럼 예제를 통해 해봅시다.
input 태그를 만들어보고 type속성의 값으로 button을 지정한 후 실제로 button값을 나타내는지 알아보겠습니다.
<!DOCTYPE html>
<html>
<head>
<meta charset="utf-8" />
<title>COREASUR - JavaScript - style</title>
<script>
window.onload = function(){
    var target = document.getElementsByTagName('input')[0];
    var attrValue = target.getAttribute('type');
    console.log('attrValue is ' + attrValue);
};
</script>
</head>
<body>
    <input type="button" />
</body>
</html>
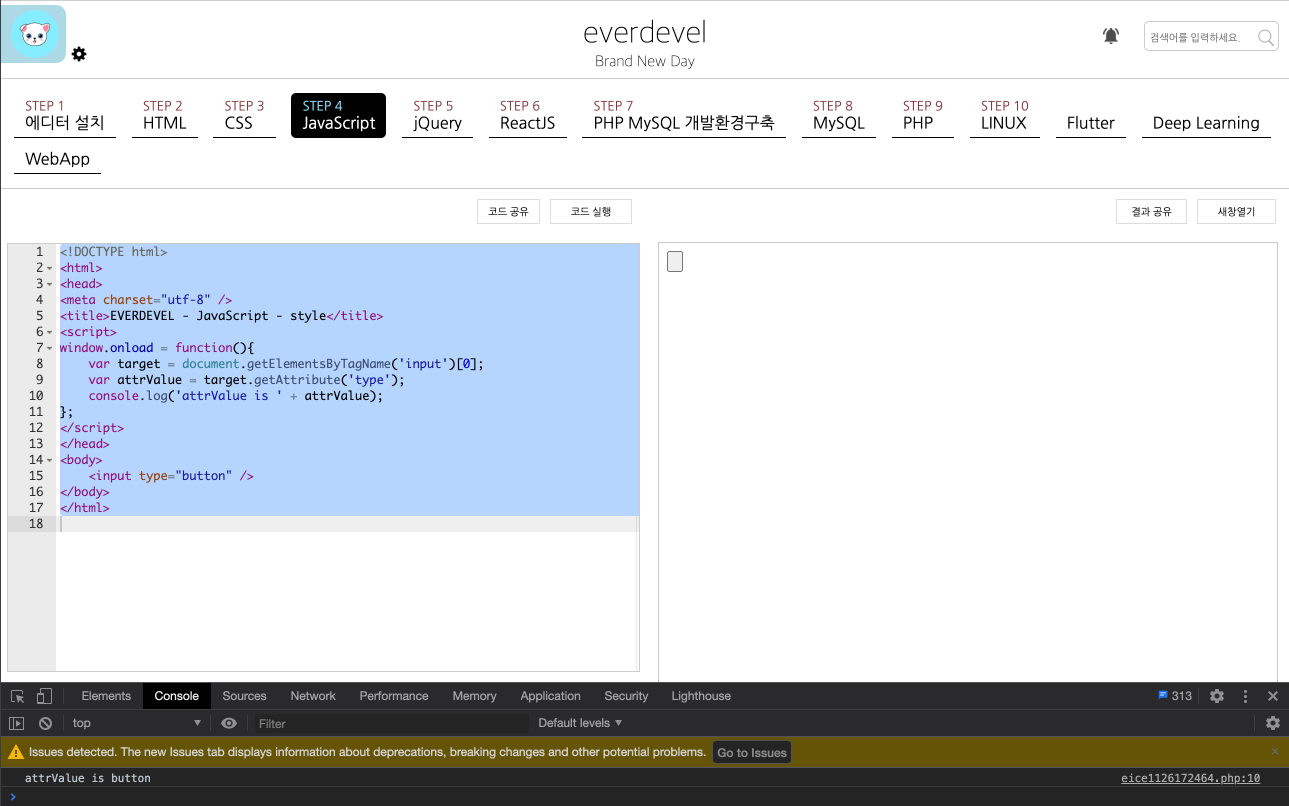
속성값을 가져와서 콘솔로그로 출력을 했습니다. 정확하게 button을 표시합니다.
즉, 이렇다는것은 type속성값을 자바스크립트를 통해 text또는 password등으로도 변경할 수 있겠죠?
속성 제거하기
다음은 속성을 제거하는 방법에 대해 알아봅시다.
속성을 제거하려면 removeAttribute를 사용합니다.
선택자.removeAttribute(속성명)
조금 더 응용하여 type속성의 값이 button이면 제거 하도록 해보겠습니다.
<!DOCTYPE html>
<html>
<head>
<meta charset="utf-8" />
<title>COREASUR - JavaScript - style</title>
<script>
window.onload = function(){
    var target = document.getElementsByTagName('input')[0];
    var attrValue = target.getAttribute('type');

    if(attrValue == "button"){
        target.removeAttribute('type');
    }
};
</script>
</head>
<body>
    <input type="button" />
</body>
</html>
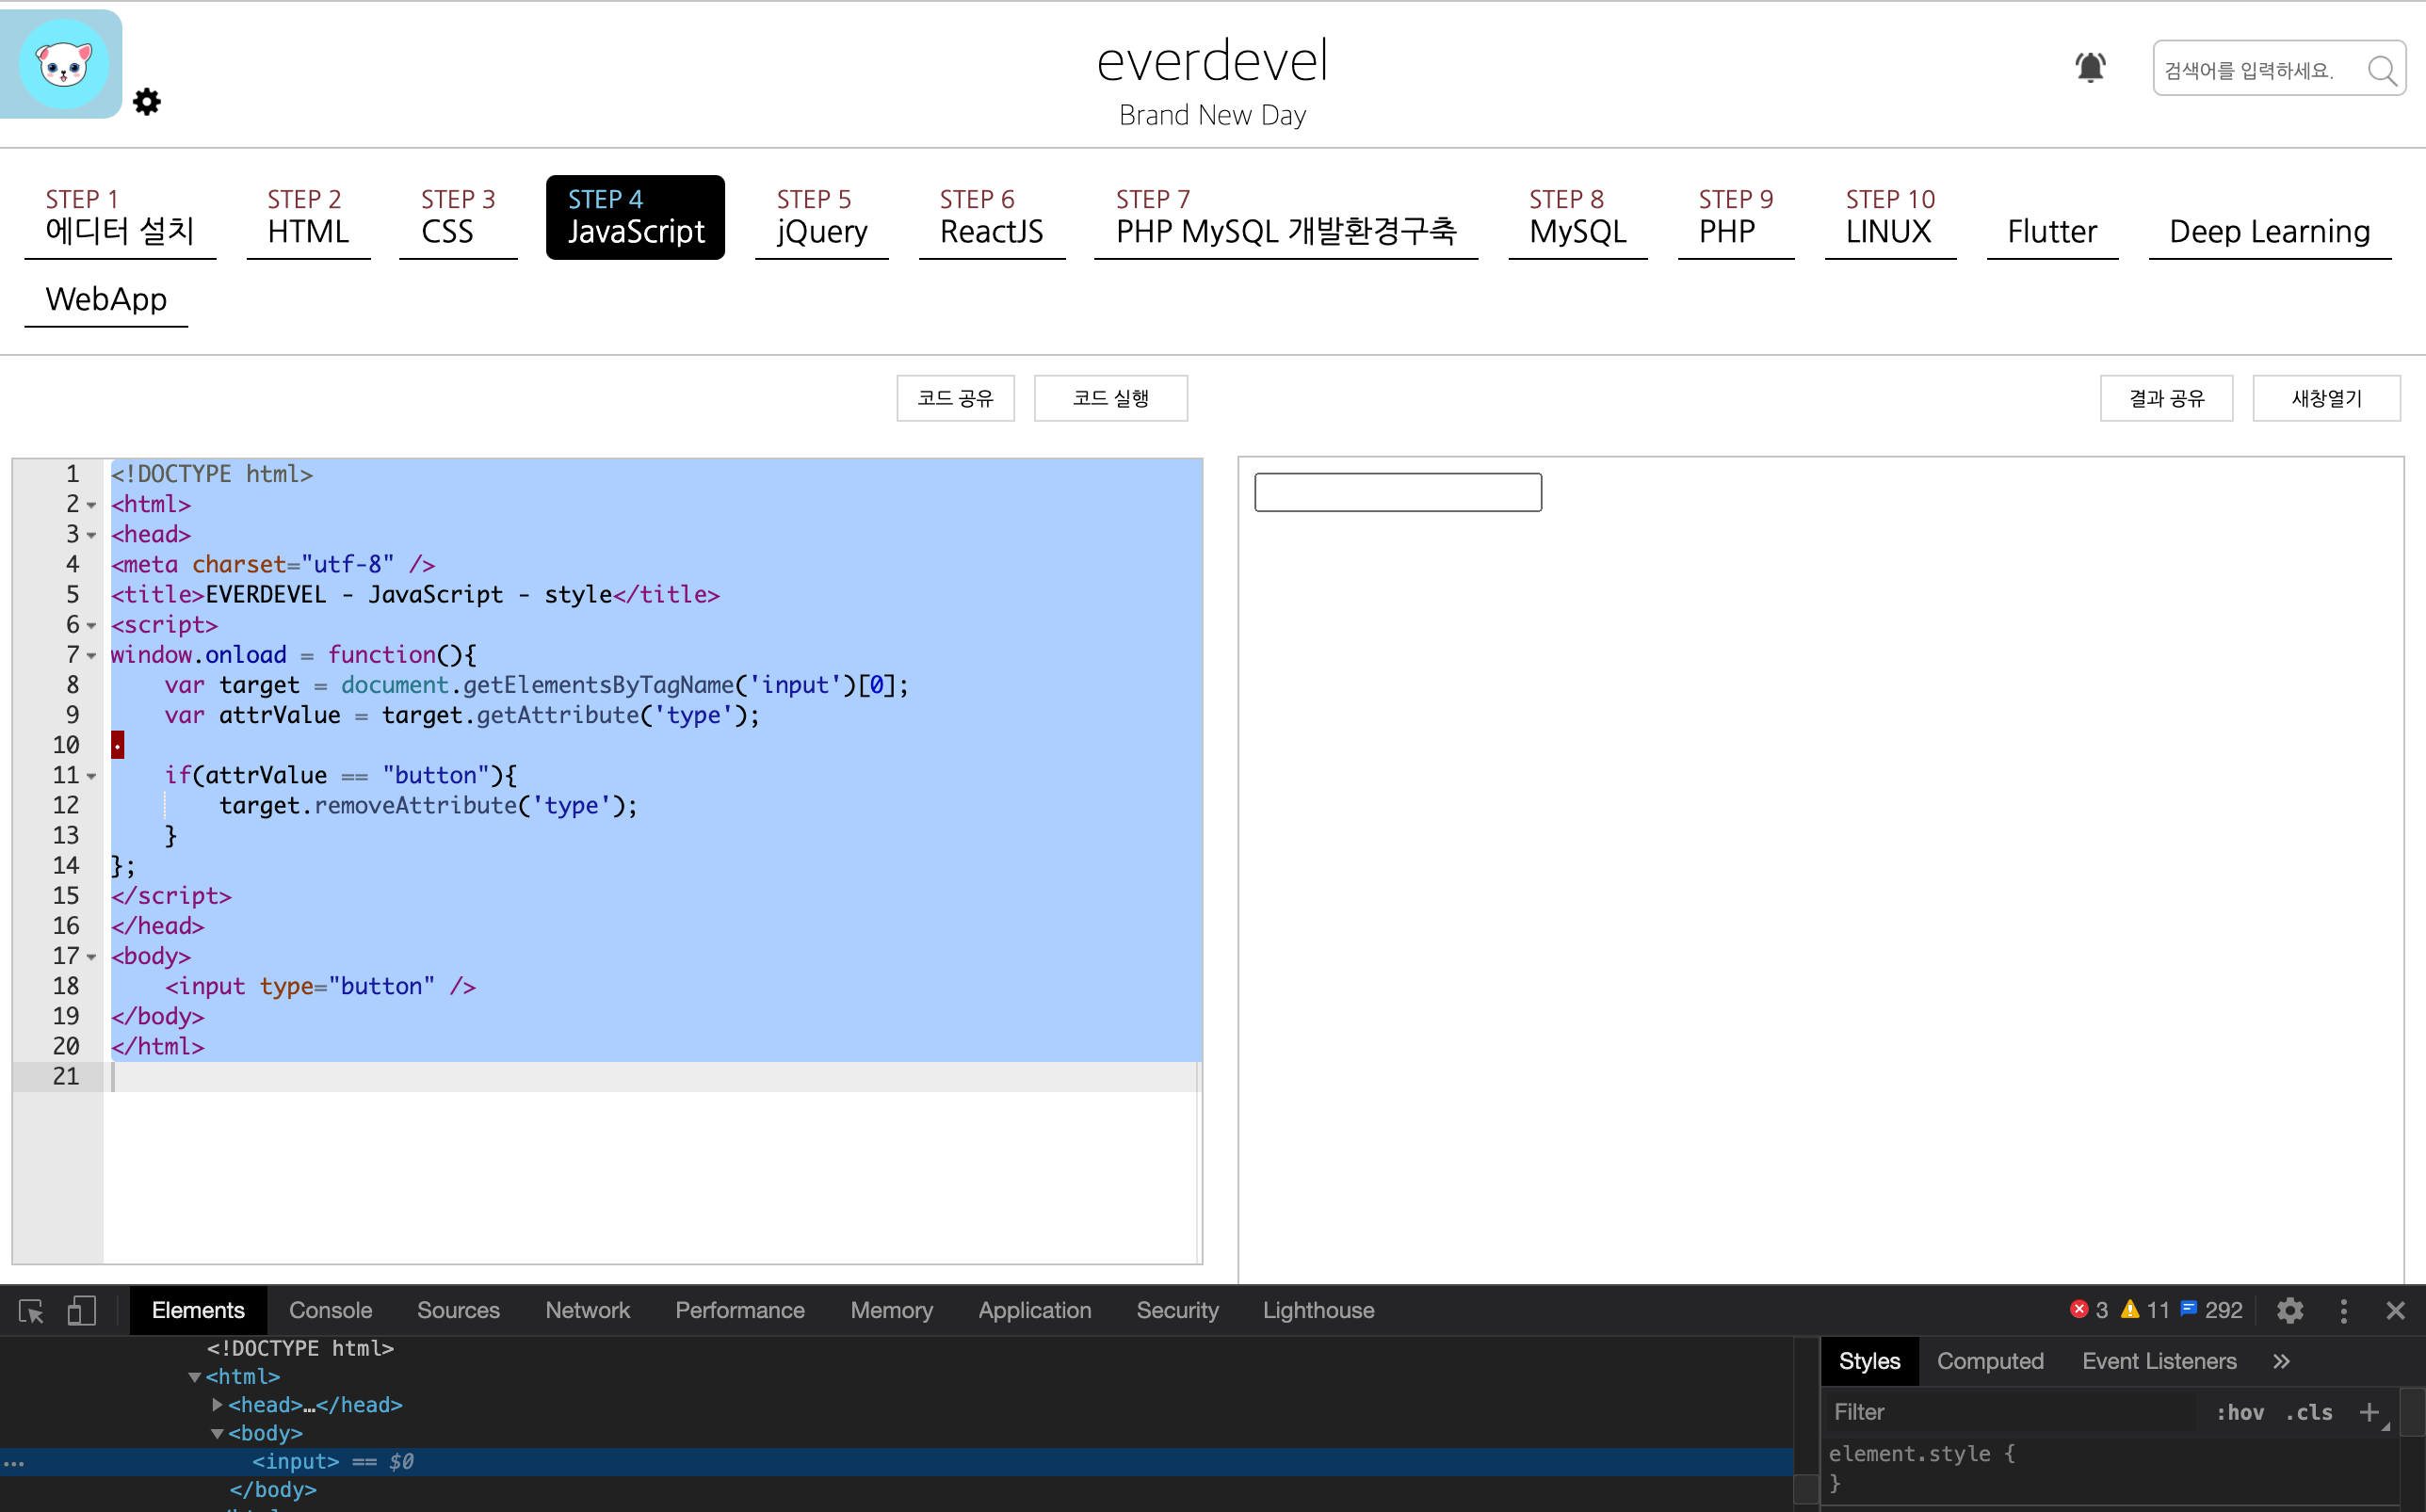
속성이 사라졌습니다. ^^
그럼 이번엔 해당 속성이 없는 경우에 속성을 추가해봅시다.
속성 유무 확인하기
속성이 있는지 없는지 확인하려면 hasAttribute를 사용합니다.
선택자.hasAttribute(속성명);
해당 속성이 있다면 true를 반환하고 없다면 false를 반환합니다.
참고로 속성이 없는데 getAttribute를 사용하면 getAttribute(속성명)는 null을 반환합니다.
<!DOCTYPE html>
<html>
<head>
<meta charset="utf-8" />
<title>COREASUR - JavaScript - style</title>
<script>
window.onload = function(){
    var target = document.getElementsByTagName('input')[0];
    var attr = target.hasAttribute('type');

    if(attr === false){
        target.setAttribute('type','button');
        target.setAttribute('value',"I'm Button");
    }
};
</script>
</head>
<body>
    <input />
</body>
</html>
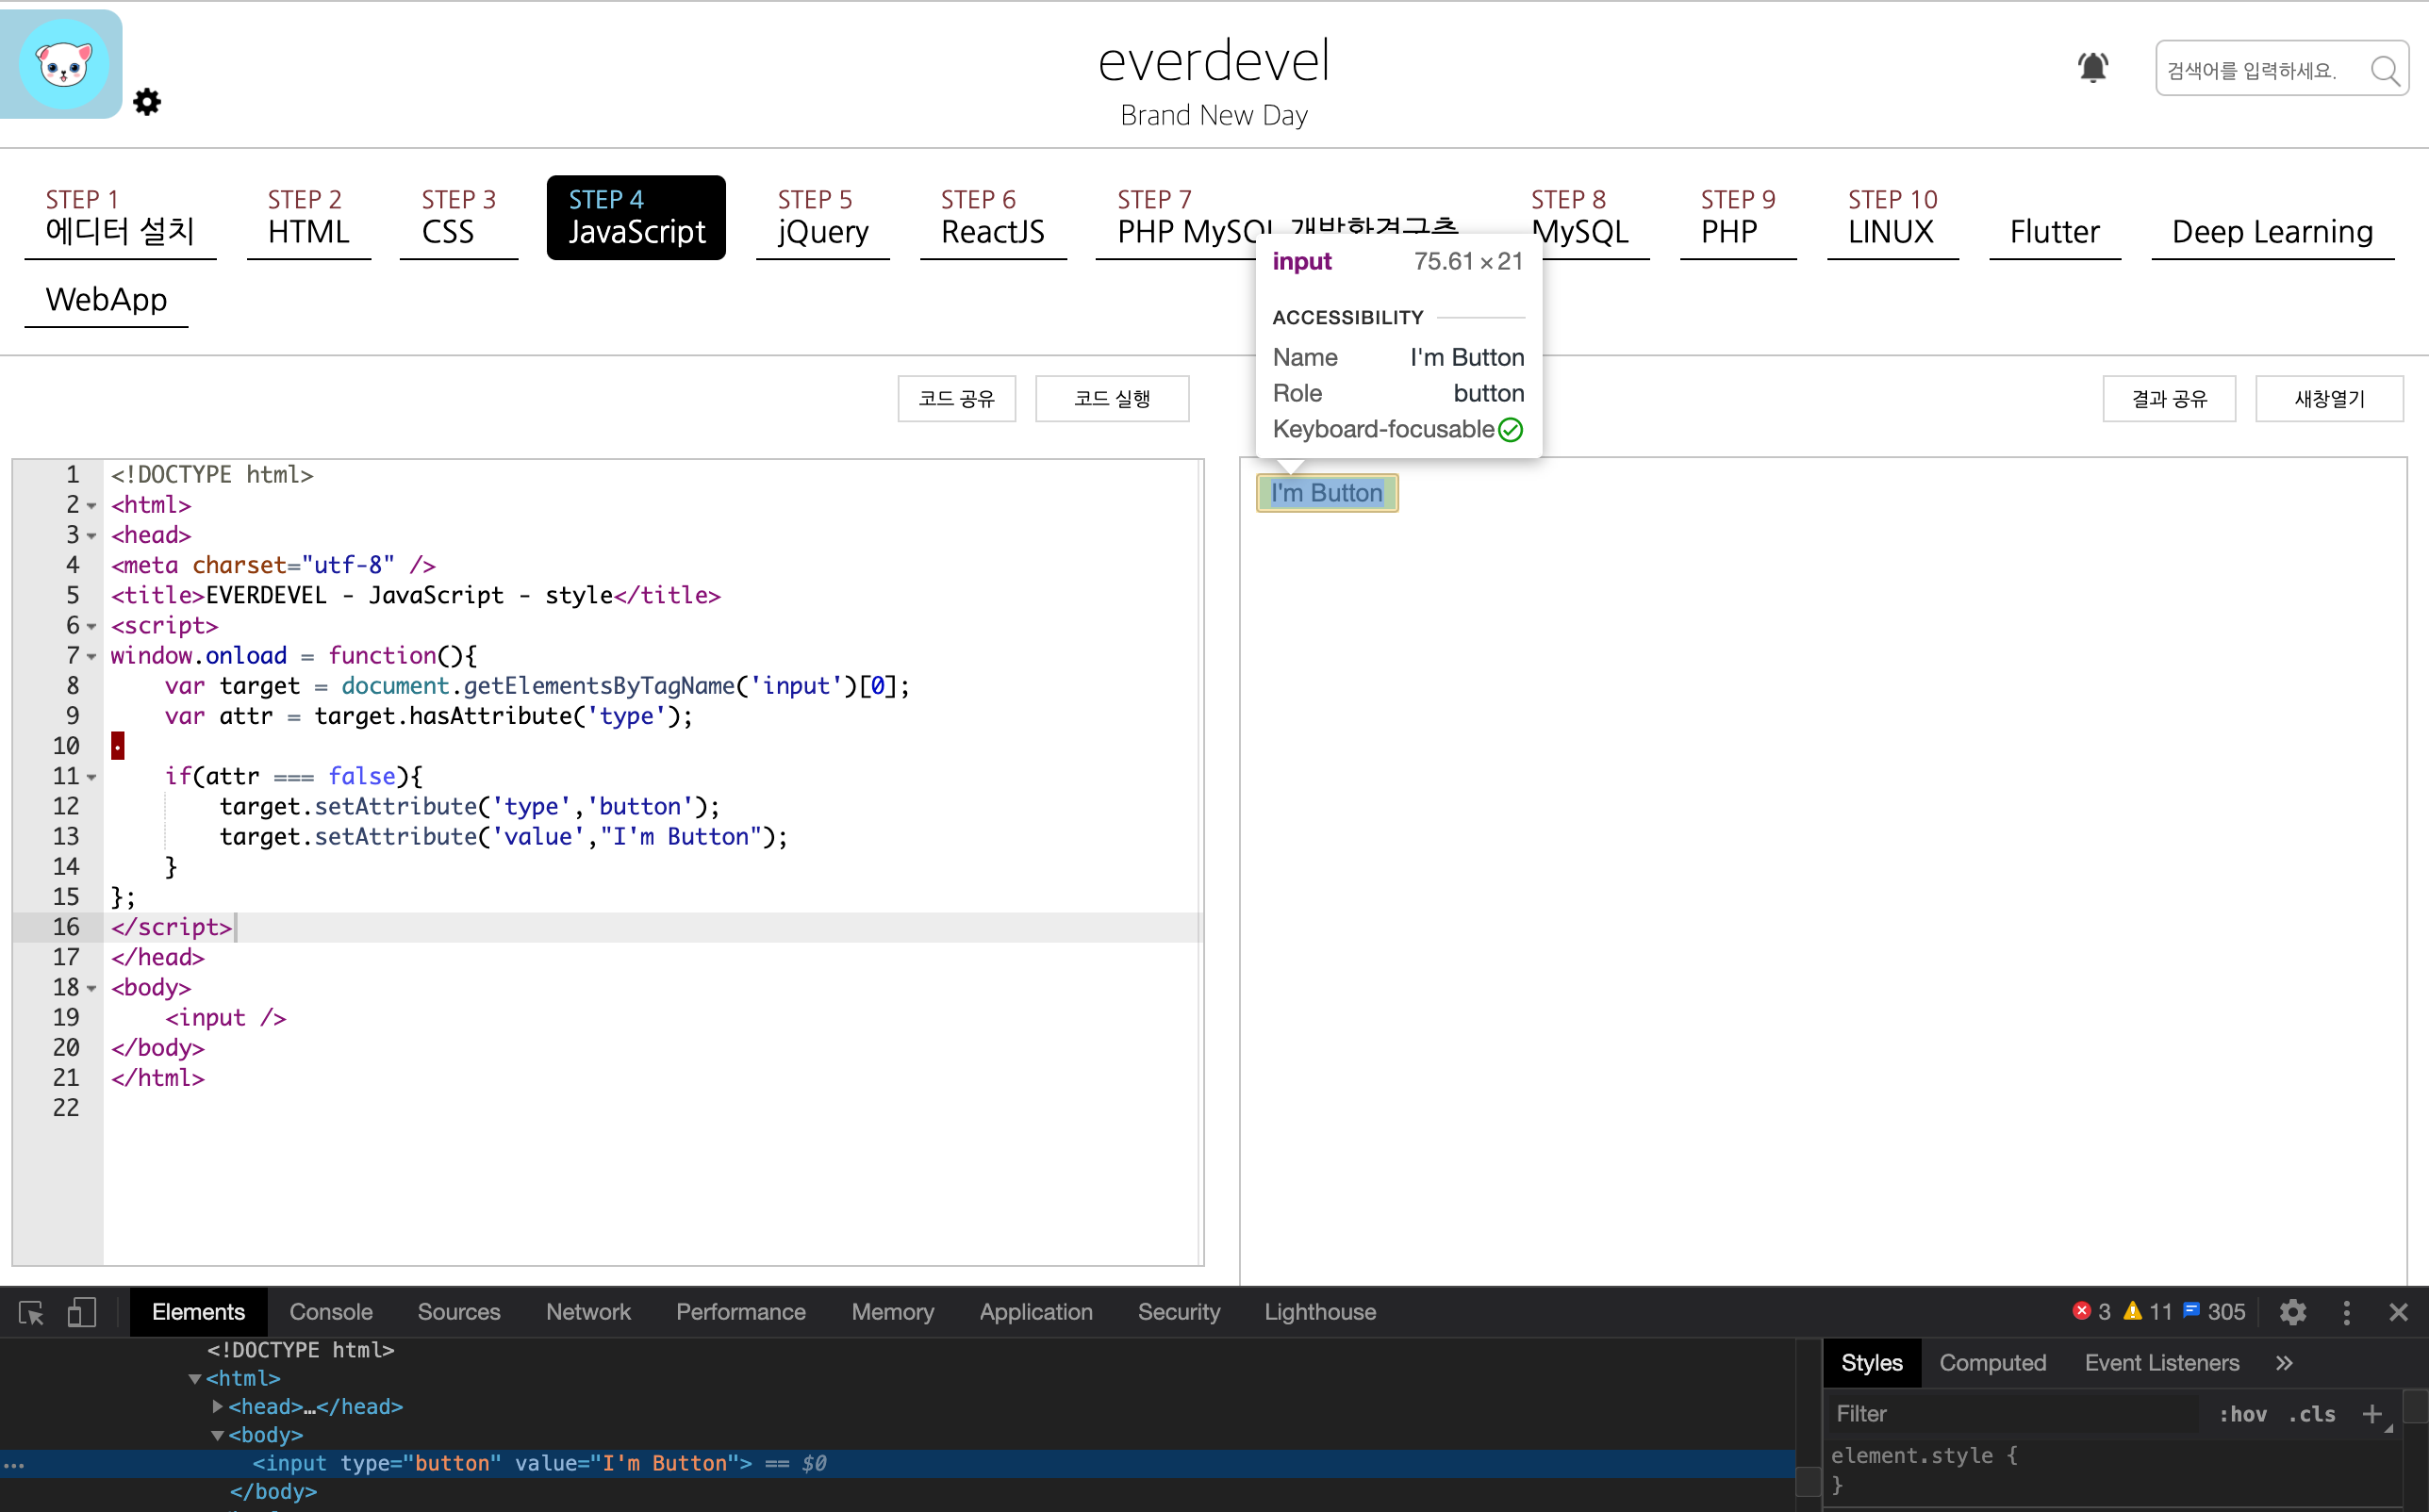
속성을 변경하려면 setAttribute를 사용합니다. 지정하는것과 똑같습니다. ^^
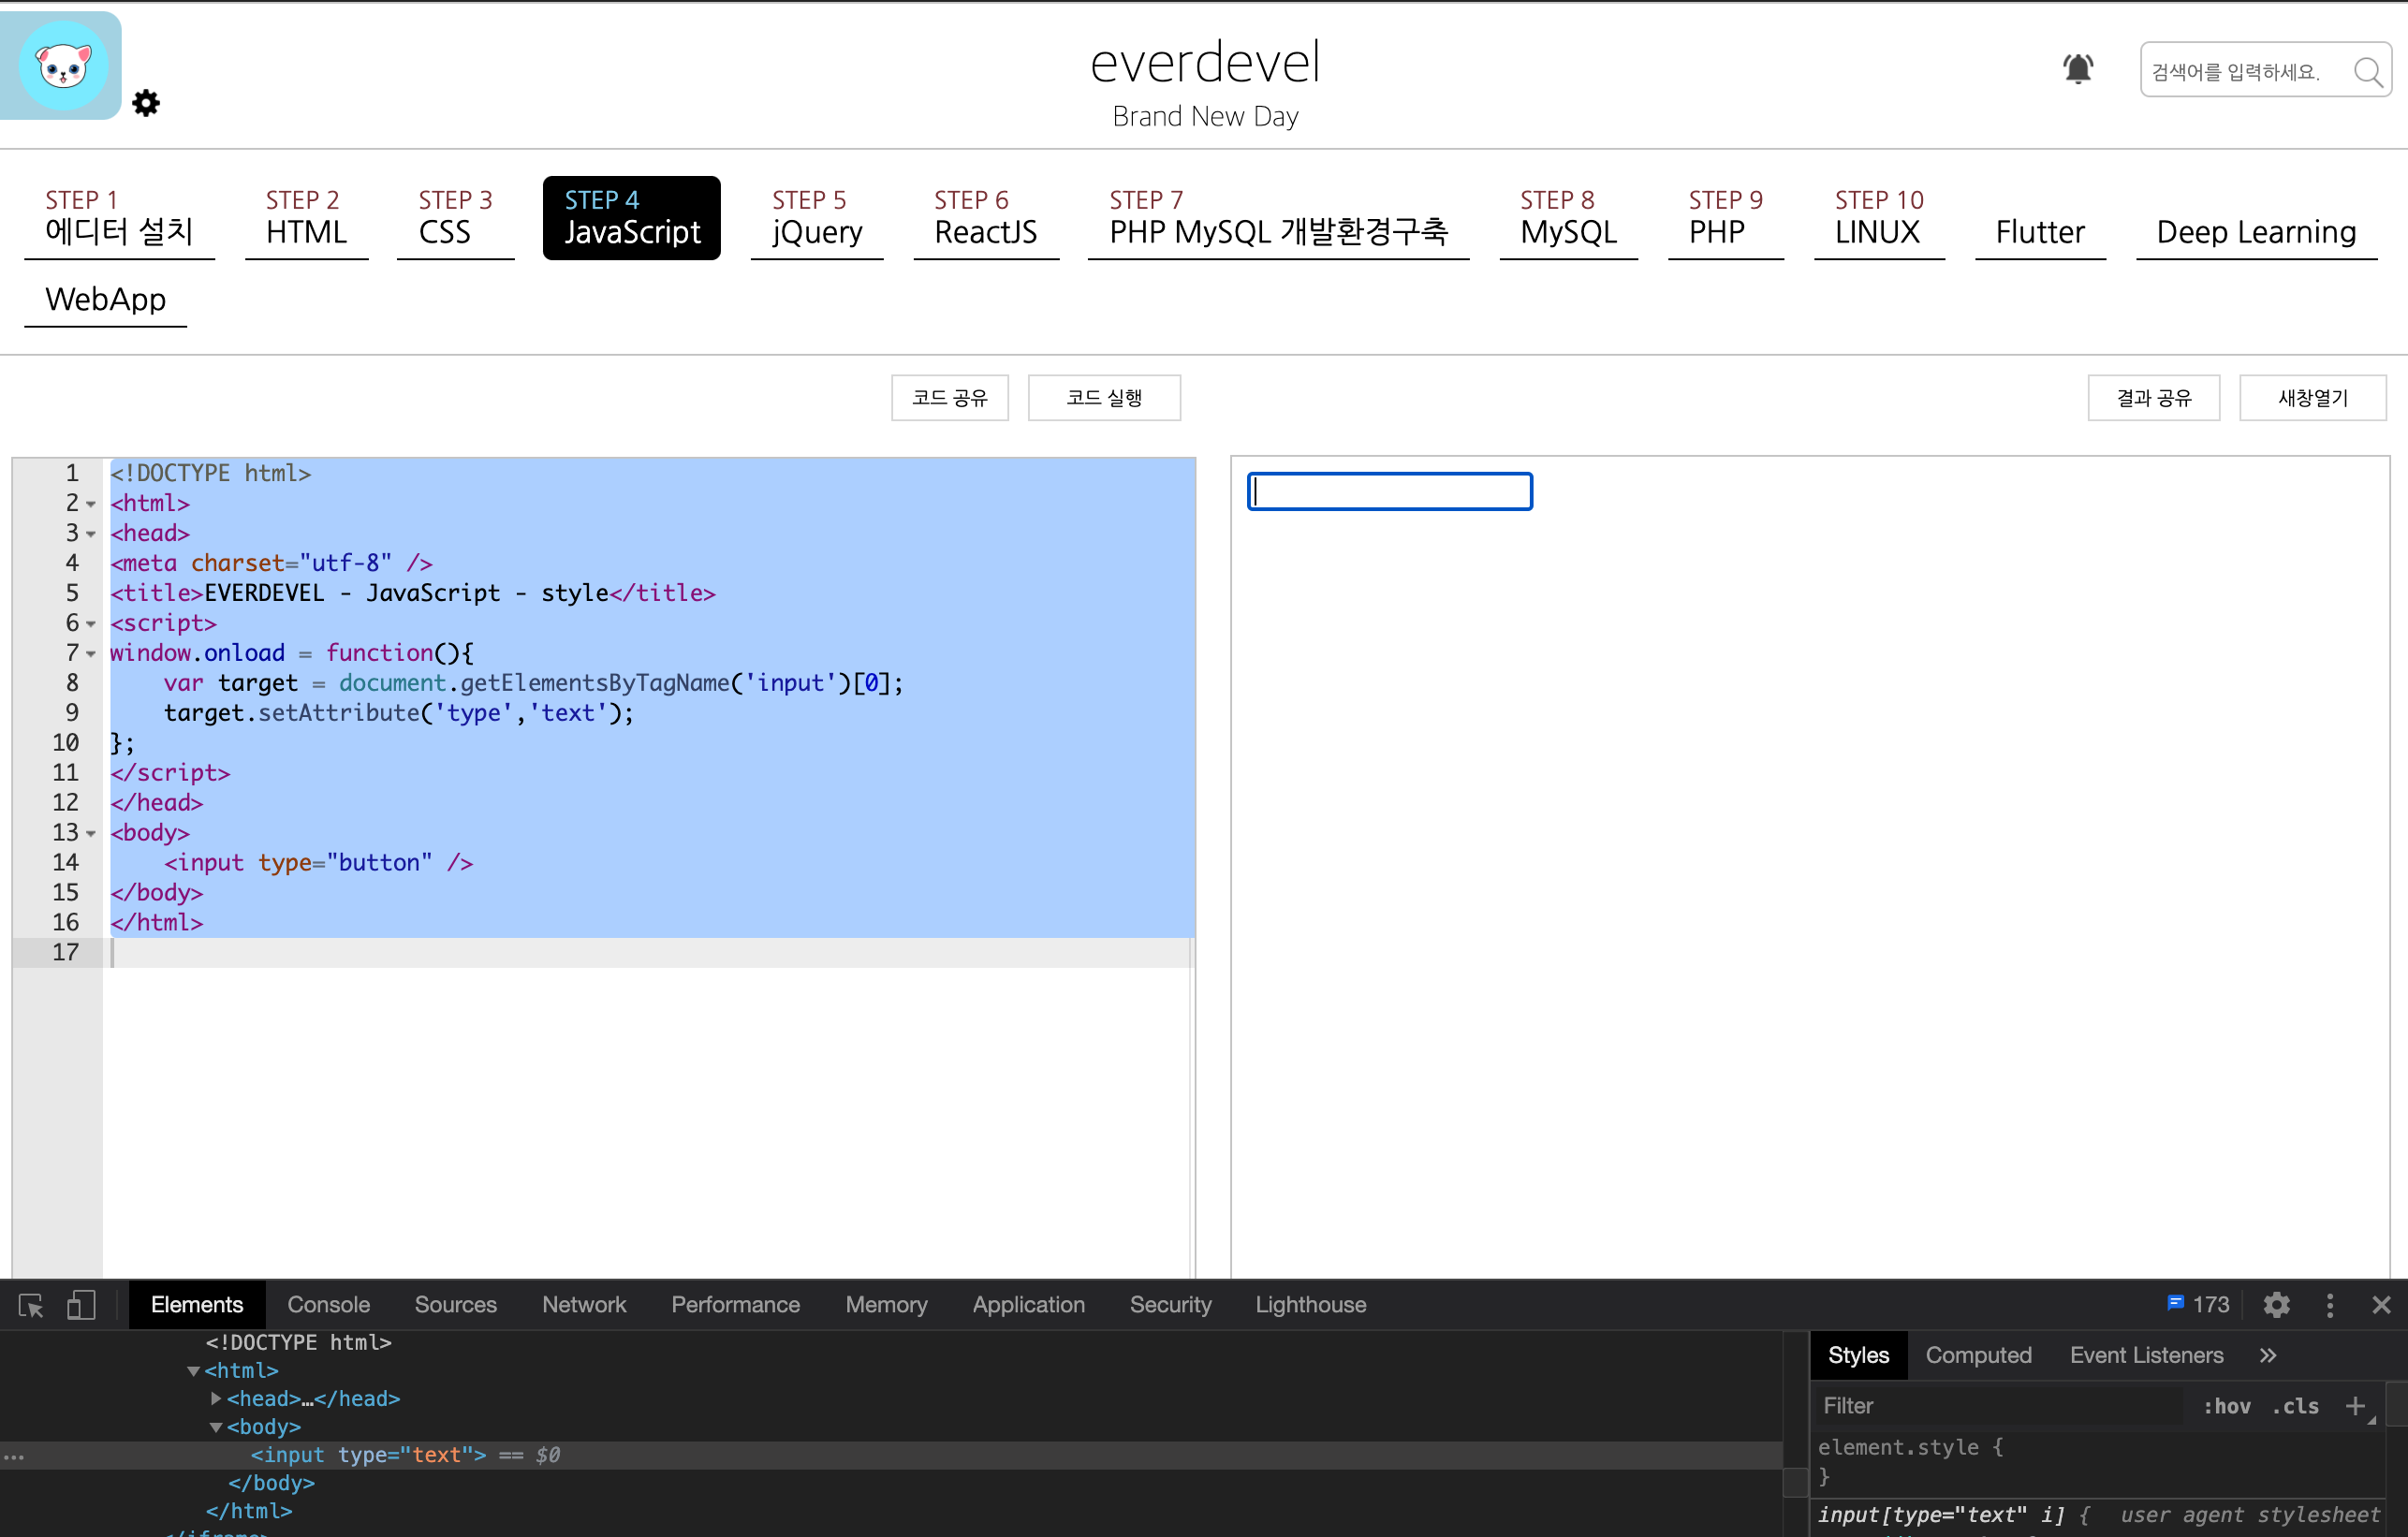
예제만 둘게요. button을 text로 변경하겠습니다.
<!DOCTYPE html>
<html>
<head>
<meta charset="utf-8" />
<title>COREASUR - JavaScript - style</title>
<script>
window.onload = function(){
    var target = document.getElementsByTagName('input')[0];
    target.setAttribute('type','text');
};
</script>
</head>
<body>
    <input type="button" />
</body>
</html>
